Friday, November 14, 2008

How To Easily Fix AVI Audio-Video Sync Problems

Audio-Video sync issues can be very frustrating, whether you have spent hours encoding a video or hours downloading it, nothing quite ruins it for you like the audio not matching the lips moving, making it look like a 1970's English dubbed karate flick. Fortunately, this problem can often be corrected in a matter of minutes especially if it's not too bad off to start with. As usual, I'll walk you through this process, how I do it, step-by-step.

NOTE: I highly advise you to make a copy of your video file (copy > paste) before trying to adjust the audio by any method, just to be on the safe side.

1. First, download YAAI (freeware):

"YAAI - Yet Another Avi Info"
yaai.sourceforge.net

Download the "YAAI executable" (current ver. is YAAI_2.0.2.485.zip) and unzip it.

2. Launch YAAI.exe, and "Open avi" dialog will appear.
3. Find and open the AVI file, and YAAI will open displaying info about your video.
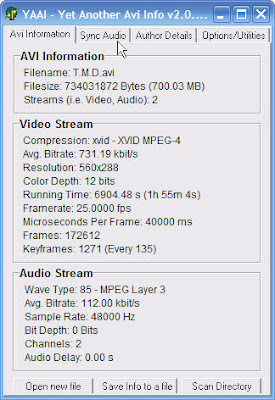
4. Click on "Sync Audio" tab. Small video player will pop up.
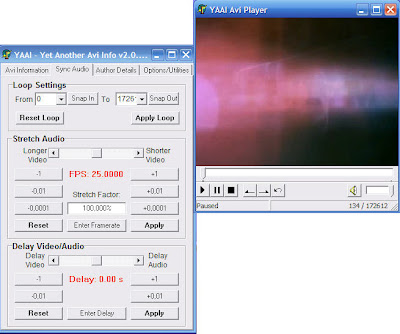

Basically, there are two types of video-audio sync problems. Often the video starts out fine but as the video plays it gets further and further out of sync. In other cases the sync is uniformly off from start to finish (and not-so-commonly you will run into a combination of both)
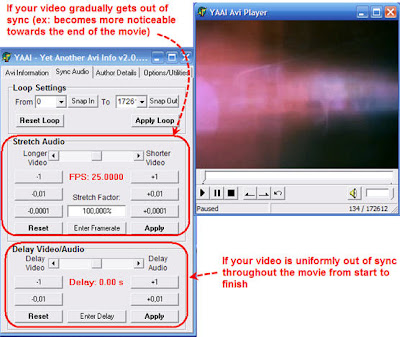

Step 5. If the audio starts out ok but by the end of a video it gets increasingly out of sync (often not even noticeable at all until the very end) what we want to do is slightly change the video framerate in the 'stretch audio' area of YAAI. If at the end the audio is leading the video click the +0.0001 button a few times to change the framerate (if the audio lags at the end, click the (-) one). Click Apply, and check it by sliding the slider on the preview player to the end of the video to see if it got better or worse.
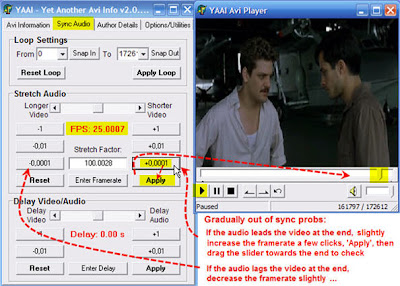

Repeat trial and error till it's right. I can usually get this perfectly synced in 2 or 3 tries. Once you get used to it and become a better judge of how much of a delay or advance to enter it becomes much easier.


Step 6. Finally, when it's in sync at the end, close YAAI tool. When it asks the question: "Do you want to keep the changes?", click Yes. The file will be corrected instantly.

If the sync is off uniformly throughout the entire movie, you use the delay audio/video settings similarly....
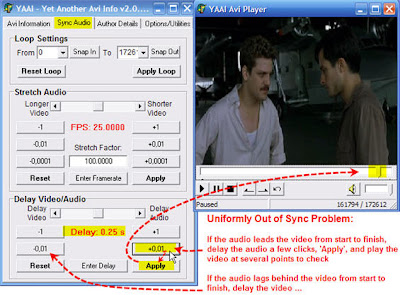

TIP: For videos where the sync problem seems uniformly off from start to finish, I usually use VLC Player to adjust the sync while playing the video to see how far off it is then I actually fix the file with YAAI using the 'delay audio/video' settings using the amount of delay/advance I figured out from VLC player (this saves time by putting you in the right ballpark in YAAI).

VLC Media Player
www.videolan.org/vlc/

Adjusting the audio-video sync with VLC Player v9.4:
Tools > Extended Settings > Synchronization, Then click the up or down buttons on the "Advance of audio over video" ('up' moves the audio back. 'down' advances it ahead of the video) while the video is playing.
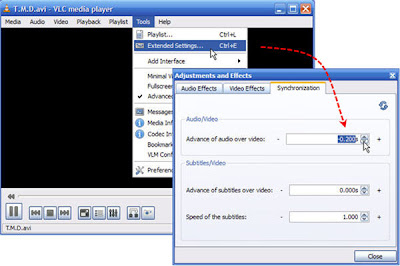

Often you have to enter a number instead of using the up/down buttons in VLC Player to get the sync just right. I usually just get it close enough to determine what value I will start off with entering in YAAI.

You can download this guide in PDF format here for your future reference.

YAAI works to fix most (but apparently not all) audio-video sync problems in videos in .AVI format, or so I'm told as it's always worked for me so far, however if this fails you, you may want to try here for several other methods.

[NOTE} I have corrected the placement of two of the images above which may have confused people (OOPS!) and made a slight edit in the instructions for clarity. I apologize if this confused anyone.

Read more...

Saturday, October 25, 2008

How To Burn Video Files (MP4, AVI, MOV, WMV, etc) To DVD With Subtitles

In this guide we will be using ConvertXtoDVD 3 to burn a movie to DVD with .srt subtitles. The subtitles will be an option you can enable or disable in the DVD's Menu after putting the disc in just as you would a retail DVD, not 'hardcoded.'


Also, We will be using VLC Player (freeware) to play the video and subtitle files to make sure we have named them correctly and that we have an appropriate subtitle track that matches our video before we begin converting.

We will be covering all of that in a screen-by-screen, step-by-step, guide that you can download as a pdf at the end for your convenience, after the jump ...

You can usually find an appropriate subtitle track to go with your movie file at one of the following sites:

opensubtitles.org
subscene.com
allsubs.org
Just to name a few

For numerous reasons (frame rates differ, video may be split in parts, etc) there are usually many subtitle choices for each movie title. Try to choose the one with the most downloads or highest rating if available first. If the frame rate is listed pick one that matches your file (see the end of this guide on how to determine your video's specs if you don't know). In any case, making sure you have a working subtitle file will be be trial and error. The subtitle files are free, small, and quick to download, and checking them is easy with VLC Player once you have renamed the video and subtitle files to match each other and placed them in the same folder.

First, you will need to make sure the video and subtitle files are named correctly and in the same folder...


Once you have made sure the files are named correctly, I highly advise you to play the file with VLC Player (freeware video player that plays almost every file type) before continuing. VLC Player will the subtitles automatically. If not, you may need to go to 'Video' > 'Subtitles Track' (Track 1) and enable it. If there is no 'Track 1' double check that you have the files named correctly and in the same folder.


Now we are ready to get started. Open ConvertXtoDVD and import your video file...


And that's it. You are ready to burn your DVD. The subtitles will not appear in the preview screen as the file converts, but rest assured that if the subtitles worked in VLC Player and appeared in the titleset, they will be an enabled feature in your DVD's menu.

You can download this guide as a PDF for your convenience here.

As I mentioned above, it can be helpful to know the framerate of your video before searching for subtitles on the subtitle sites, as sometimes (but not that often unfortunately) they have the framerate listed. You can find out all of your video's specs with the "GSpot Codec Information Appliance" (Freeware). GSpot will not only tell you the framerate, bitrate, screensize, it will try to check to see if you have the all of the necessary codecs to be able to play the video on your computer (something that is unnecessary if you use VLC Player).

Just drag and drop your file onto the GSpot window and that's it.


It analyzes and reports to you. That's all it does. A very handy piece of freeware.

Read more...

Friday, October 24, 2008

How to Burn an AVI, MP4, MPEG, etc.. Video File To CD-R To Play In DVD Player

This guide will cover how to produce as high quality a VCD (on a regular 700mb CD-R) as is possible from a full length movie video file of most any file type (MP4, DivX, AVI, MOV, MPEG) in a format that will play on most (but not all) DVD players, not just DivX capable ones. Of the 3 DVD players in my home, none are DivX/XviD/AVI capable, but 2 of the 3 play these VCDs just fine with impressive results (the one that wont is a cheapie 'Philco DP100HH8').


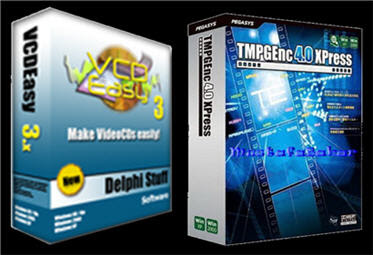
Also, in this guide we will use software that is not free. Specifically: TMPGEnc 4.0 Express and VCDEasy v.3.1.0, but you may be able to use their free versions, TMPGEnc v.2.524 available for download here and VCDEasy v.1.1.5.2 available here instead. Sorry, I won't be ditching my versions for their free predecessors to find out for you. I will also be using ImgBurn (freeware) to actually burn the file to CD.

I've put together a Screen-by-Screen, Step-by-Step pictorial how-to after the jump...

- - - - - - - - - - - - - - - - - - - - - - - -
Note: The size of the file you want to put on a regular CD isn't as important as the length of the video. It doesn't matter whether it is a 1500mb H.264 MP4 or a 700mb DivX/XviD AVI. If they are the same length, the MP4 mentioned will look better than the AVI but take more than twice as long to convert. However, if your movie is much longer than 2 hrs, you may want to consider splitting it to 2 CDs or putting it on a DVD. I personally prefer to burn any high quality H264 videos to DVD anyway and mainly just burn the all-too-common 700-800mb AVI movies to CD, and do not burn any movies longer than 2 hrs on a single CD.

The steps we will take:
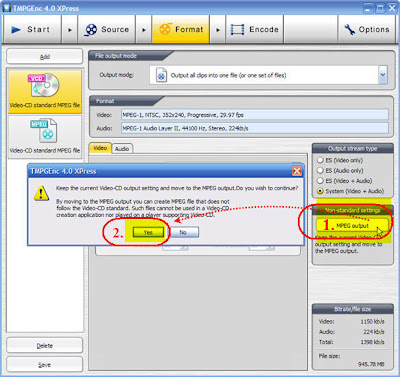
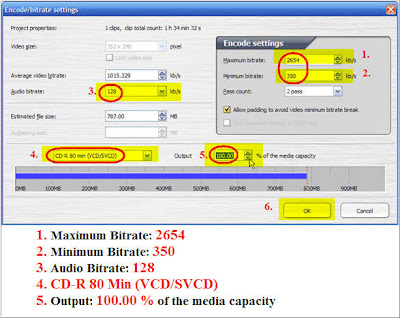
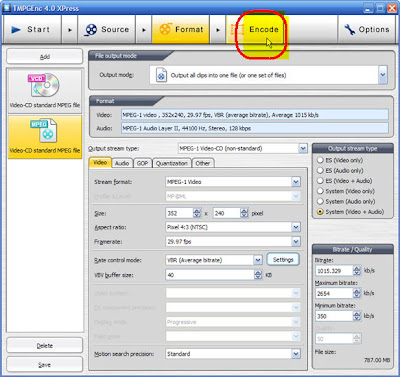
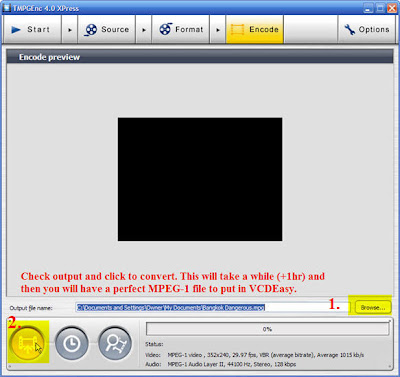
1. Convert the file to an MPEG-1 compressed with TMPGEnc 4.0 Express to fit on a CD.
2. Convert the MPEG to a disc image (cue and bin files) to burn to the CD with VCDEasy.
3. Burn to CD with ImgBurn (or Nero if you have it)

(just click on any image to enlarge)
TMPGEnc 4.0 Express:

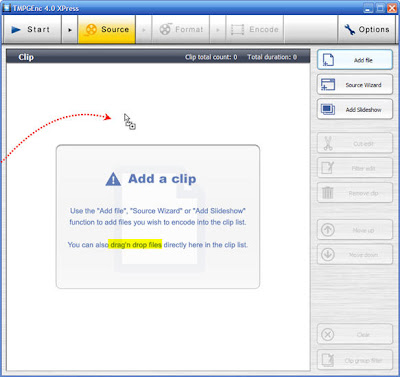
Just Drag & Drop the video file (or click "Add file")...


(Above)
1. Choose "Video CD standard MPEG file"
2. Choose correct standard for your DVD player (NTSC/PAL)
3. Click "Select"

(Above)
1. Choose "MPEG-1 Video CD (non-standard)" <- Important or your file won't fit on a CD.
2. Choose "VBR (Average bitrate)"
3. Click "Settings"


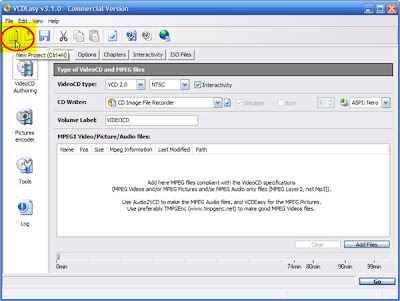
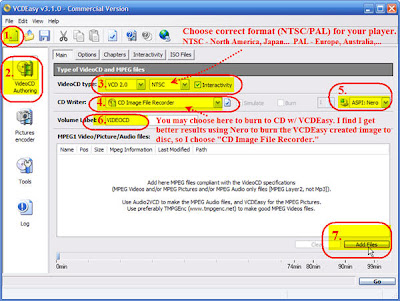
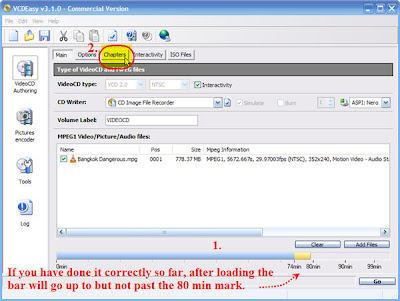
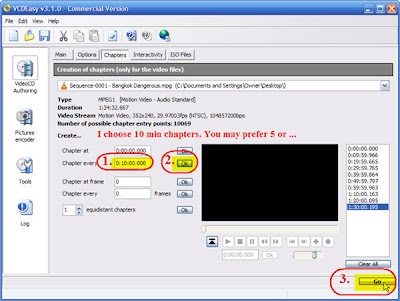
VCDEasy:


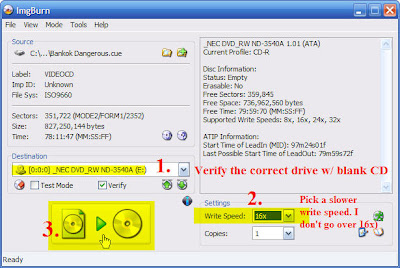
Although, as noted in the pic above, I use Nero to burn to CD, you could also use ImgBurn (freeware). I've included the steps to burn with ImgBurn at the end of this pictorial.


Although I personally use Nero (an older oem version) to burn my CD's, I've learned that ImgBurn (freeware, download here) does a good job of it too. There are so many different versions of Nero out there and few like mine (Nero Express 6) that a tutorial on it seems pointless, so here is how to do it with ImgBurn.

(Above) Right Click on the '.cue' file you just created with VCDEasy and choose "Burn using ImgBurn"


And you're done!

You can download this guide for your future reference as a pdf here:

Read more...

EZ - 4 Free Ways To Download & Convert YouTube Videos


In this video we run you through 4 different methods of downloading a YouTube video and convert it to another file type (.mov in this case).
4 Methods
1. Convert online and download already converted file
2. Download the YouTube .flv (flash video) file then convert it with the help of a YouTube download website like keepvid.com.
3. Use the FireFox Add-On 'Video DownloadHelper' to download the .flv file and convert it (By far my favorite method).
4. (old school) Just watch any YouTube video and then grab the .flv file out of your temporary internet folder and convert it.
We'll go into more detail and include links to all of the sites and software used in the video after the jump...

1. Convert online using a site like vixy.net or convertyoutube.com (as you'll see, in this video vixy.net didn't want to play nice. Unfortunately that's common with the convert online sites). Vixy.net does work and is one of the most popular online convert and download sites -- so popular it is having trouble handling the load. Though it's my least favorite, this method is perhaps the easiest way to learn and doesn't require you to download any software.

Other online conversion sites are:
convertdirect.com
media-convert.com
zamzar.com (this one will email you the converted file, if you want to go that route)

2. Use a YouTube flv (flash video) download site and convert it with WinFF video converter (freeware) WinFF video converter (freeware) is the easiest to use free software that converts flv, wmv, avi, mov, etc.
YouTube flv (flash video) download sites:
keepvid.com (Of these sites, I like this one best)
videodl.org
youtubia.com
techcrunch.com

3. Use the FireFox add-on Video DownloadHelper to download the .flv file and convert it with WinFF. Video DownloadHelper works with many different sites and file types, not just YouTube. This is definitely the best/easiest way imho.

4. The no software way. Just watch the YouTube in Internet Explorer and then grab the .flv (flash video) file from your temporary internet folder then convert it with WinFF. As you can see, whenever you watch a YouTube video, or many of the flash video sites online, you are actually downloading the video already to your computer to watch it. The above methods just make it a bit easier.
To play YouTube's flv files on your computer I recommend VLC media player (Freeware - plays just about every video file type). It's my default player for most every file type.

Here's a review: "VLC Media Player, play everything anywhere"

All of the software/sites mentioned above are completely free, and with the exception of zamzar.com in method 1, none require you to register or disclose your email or anything.

Read more...